Ever wondered what a proper T.38 Fax over IP (FoIP) transmission looks like running through Wireshark? Maybe you’re troubleshooting a call flow, or never seen a T.38 capture. Below I’ll try to explain the call flow and steps to look out for when troubleshooting T.38 calls. Here’s an Outbound FAX call originating from a FXS port in a Cisco CUBE, and going towards Flowroute.
- Initial SIP INVITE and early media receipt (ringback). Note this is all RTP.

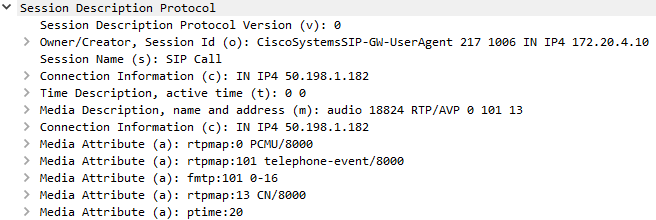
- SDP from the INVITE shows media offered is all voice (RTP)

- 183 Session in Progress, and we start sending media too (again, RTP). Later on comes the 200 OK, meaning the call was answered on the remote end.

- Things changing now… in-dialog (RE)INVITE from Cisco CUBE to SIP trunk… RTP and T.38 packets mixed because the remote end has not accepted our INVITE yet, but we start sending media either way.

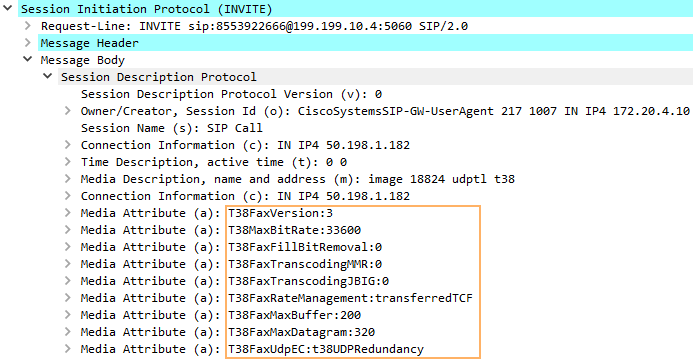
- And the SDP of the new INVITE now shows all T.38 media now.

- Once we get the 200 OK from Flowroute, it’s all T.38 media both ways.

- Now the flow gets interesting, more Fax-ey. Wireshark will decode the HDLC data and show interesting bits here
- TSI, is our Fax station number programmed in the machine.

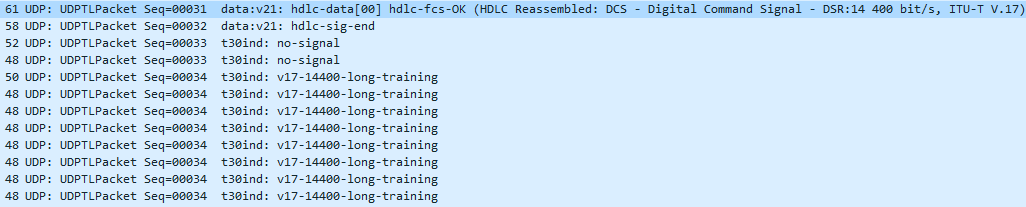
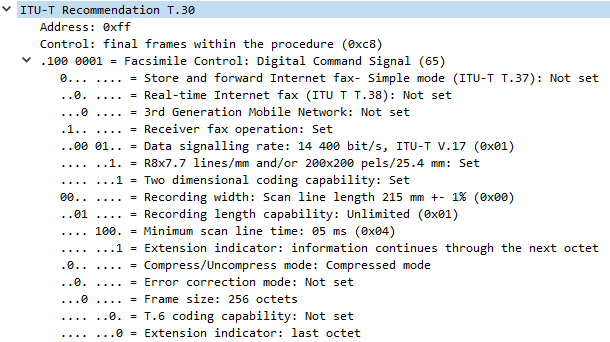
- DCS, our Fax machine communicates the capabilities, and starts training.

- If we look inside the packet’s data, our DCS has a lot more information about our Fax machine’s settings and resolution

- Then we get an FTT, means the remote end “Failed to Train”. Not usually a sign something is wrong, but more a capability mismatch. The remote fax may accept only lower baud rates, and will fail to train any higher. This is normal unless it’s the only response we get back from the remote end.

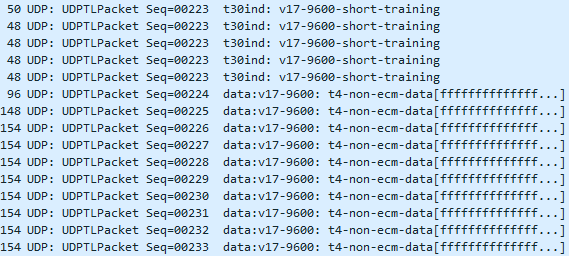
- We see the same process of TSI, DCS and FTT until we hit the right baud rate… in our case it’s 9600… Once we get that, we receive a CFR.

- Followed by a short training to sync-up and data (because we did long training before the CFR)

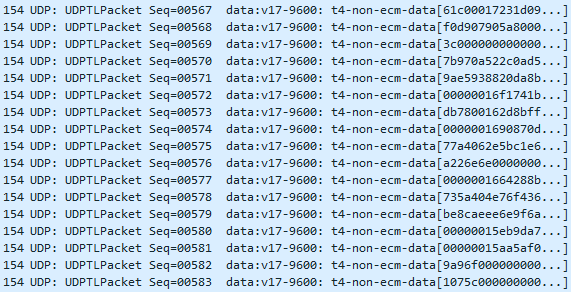
- And our actual FAX data which will vary

- At the end of the data, Wireshark reassembles the packets and tells us whether there was a loss or not. In our case, we’re good!

- We send an EOP to signal the end of the transmission

- The remote end does an MCF to acknowledge receipt (this is how your Fax machine knows the fax is “good” on the other end)

- And then we send a DCN to logically hang up the HDLC stream, but we wait for the remote end…

- Remote end hangs up the call… and we’re done…

- TSI, is our Fax station number programmed in the machine.


And that was it. Many exchanges and training but in the end our page was sent over a SIP trunk, negotiating T.38, training with the remote fax machine at 9600 baud, and transmitting one page in about a minute.